Version 7.4
7.4 carries with it a major improvement to OAuth Apps as more customizations will now be available. Users will be able to create and manage multiple credentials per app, which can currently be used for the SMTP and Email To Fax functionalities. These enhancements will help customers make integrations with custom workflows more seamless and reduce the dependency on legacy apps, which will later be phased out completely.
OAuth 2.0 Apps implementation
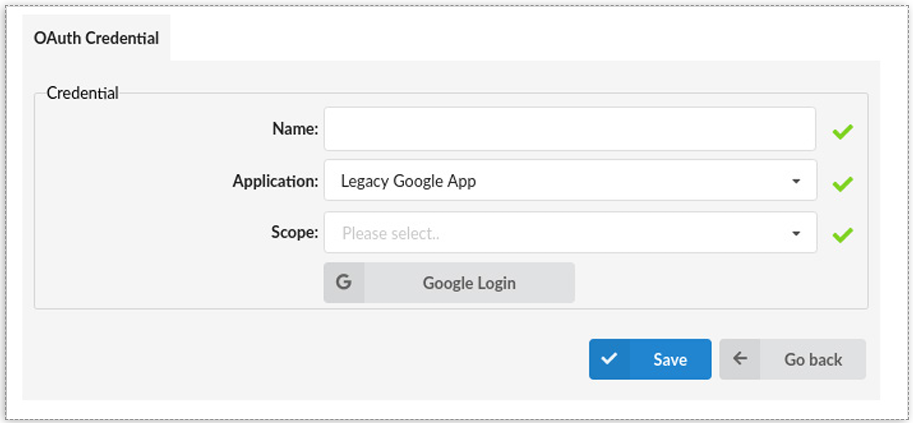
The OAuth 2.0 Apps implementation gives customers the ability to add their own custom OAuth Apps and credentials in addition to using the legacy ones (Google and Microsoft
legacy apps, which will be disabled in the future). They can be used for SMTP or Email To Fax configuration, and authorized with OAuth providers. Within the ‘Settings’ tab, users can navigate to the OAuth section and refer to either ‘Apps’ or ‘Credentials’ for detailed configuration and management of OAuth integrations.
Apps
The ‘Apps’ section allows users to control and manage their custom apps by adding, editing, and deleting them. (NOTE: it is not possible to edit legacy apps, as they can only be removed. Once removed, they cannot be re-created.) Within this section, users can see details such as the name of the app, the provider being used by the app, selected scopes, tenants that are assigned to the app, and status, which indicates whether the app is enabled or disabled.
Users will be able to add their custom app by clicking the ‘Add OAuth App’ button, where they will be prompted to toggle yes or no to enable or disable the app, enter the name for their app, and choose one of the providers from the dropdown menu (currently only Google and Microsoft are available). They will also need to enter the Client ID and Client Secret, which is obtained from the OAuth application created with the provider’s service. Users can also select the scopes for their app from the dropdown menu (Currently available options are Mail and Storage).
Credentials
This section allows users to add, edit, and delete credentials for the already created OAuth apps, including the legacy ones. Users will also see a list of already created credentials along with information about them, such as ‘Name’ (of the credential), ‘Creation Date’, ‘App’ (name of the app using those credentials), ‘Provider’, ‘Scope’, ‘Tenant’, and ‘Status’ which shows if the credential is valid or not. Users can add credentials by clicking the ‘Create Credential’ button.
New Endpoints
CRM Integrations
Supported CRM Systems
| Bullhorn | HubSpot | Microsoft Dynamics | Pipedrive | Proprietary CRM | Salesforce | SugarCRM | SuiteCRM | Vtiger | Zendesk | Zoho |
Link to a Call Record
The new features include the ability to upload a link to call records, applicable to all existing CRMs.
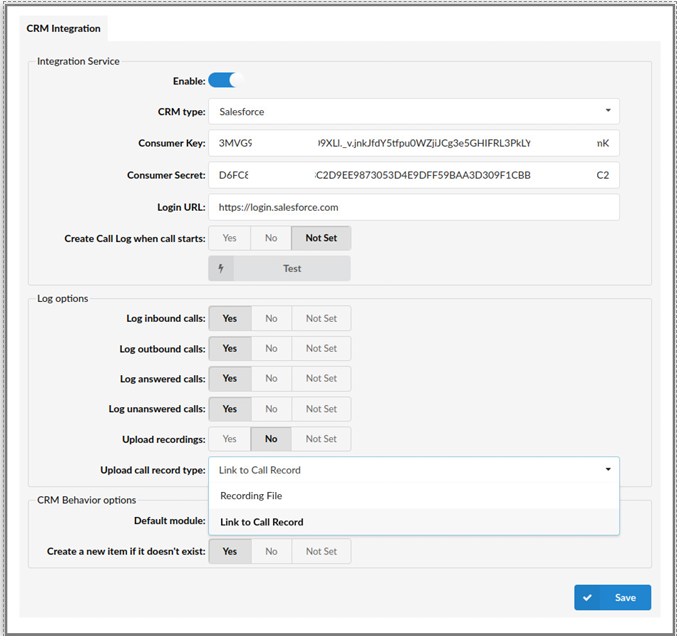
So, besides uploading recording files in the CRM, users now have the option to upload links to call records, which provides flexibility since they do not need to download the file; they can simply click the play button. (OSC)
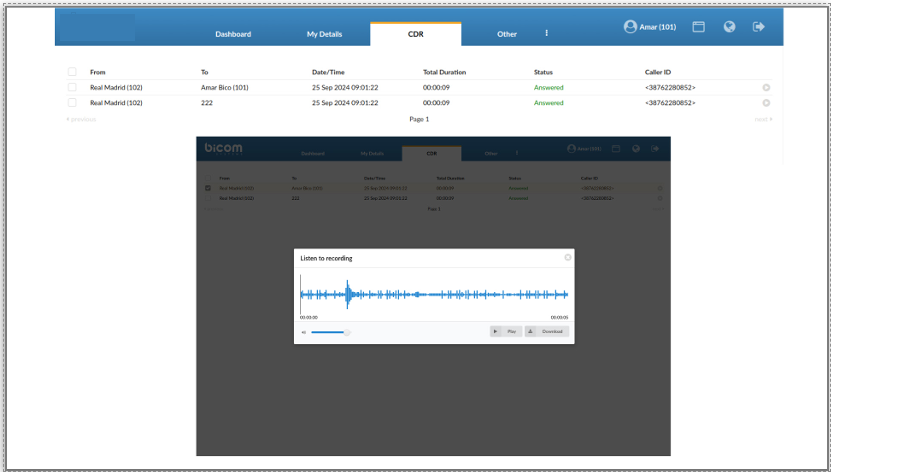
Moreover, this feature saves storage space, which can help prevent subscription cost increases for certain CRM packages due to reduced space usage.
Custom CRM Settings
The CRM URL limit has been increased, removing previous restrictions on submitting requests with additional information. Options for configuring the HTTP POST method, including adding custom HTTP headers, have been added to enable more flexible data submission.
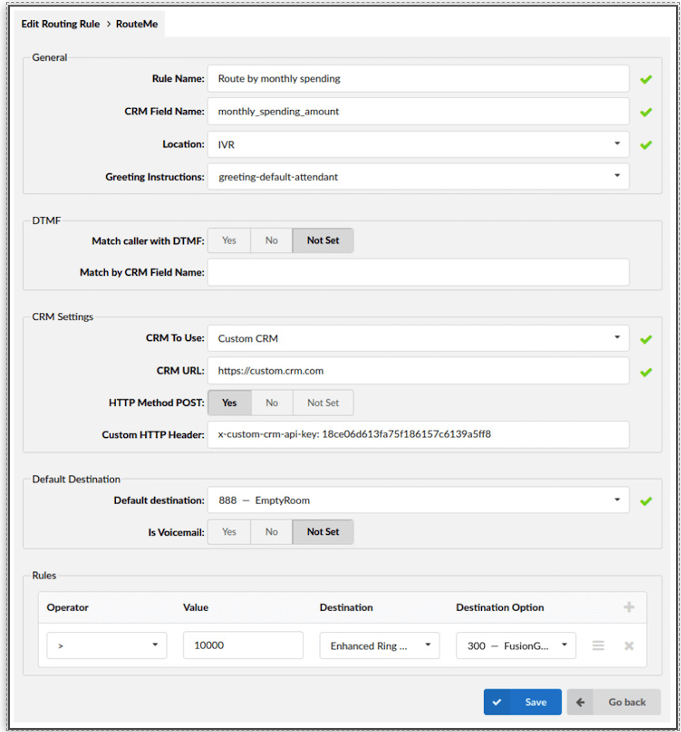
ZOHO Record Creation
Additionally, the “Preventing multiple lead creation by default” feature is specifically available for Zoho CRM users. This option enables users to choose between ‘Automatic’ and ‘Manual’ record creation when the caller number cannot be found in Communicator’s contacts or in Zoho CRM’s records. If the ‘Automatic’ option is selected, the system will attempt to create a record using the caller’s number. If the ‘Manual’ option is chosen, a Communicator popup will open a page in Zoho CRM for creating a new record.
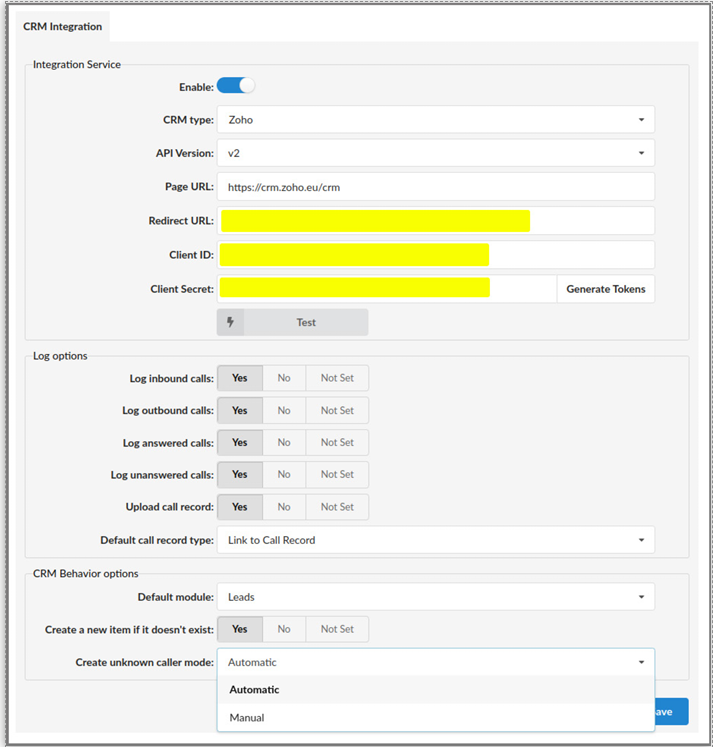
This feature is designed to prevent the creation of multiple records with the same data, which can happen when multiple extensions are ringing for the same call.
CONTACT CENTER MODULE
OMNI Channel
The Customer Satisfaction Survey
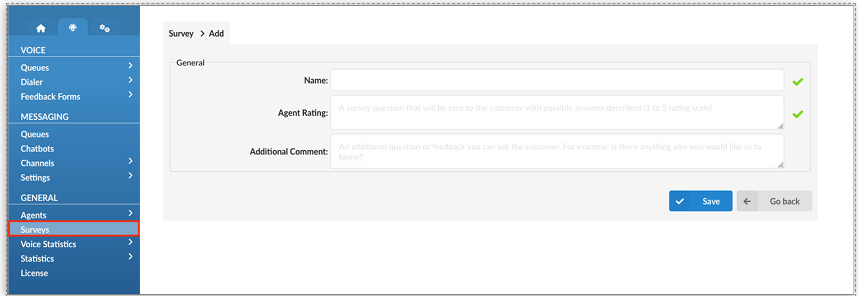
The Customer Satisfaction Survey feature allows businesses to collect valuable feedback from customers immediately after a voice or messaging conversation ends. Customers can rate their experience by pressing a number on their phone in response to a prompt or submitting their rating through a messaging conversation. This survey feature is available across all channels, excluding email, helping businesses evaluate and enhance the quality of their voice and messaging support services. Users can create a Survey via the Add Survey button in the Surveys section, choosing between the Voice and Messaging options. Once configured, the voice survey allows customization of key elements, including a unique survey name, an optional pre-survey announcement message, an agent rating question, and a closing thank-you message.
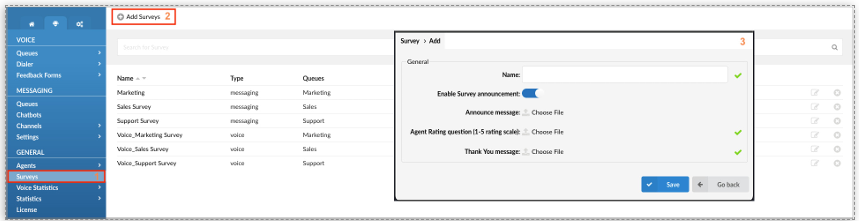
Configuring a messaging survey requires users to provide a survey name, a message to the customer explaining how to rate the agent, and a message inviting additional comments and feedback.
Survey Statistics Reports
Dedicated survey statistics reports, “Agent Survey per Queue” and “Queue Survey per Agent”, were created to offer insights into customer satisfaction across voice and messaging interactions. This report can identify areas where customer support may be less effective, highlighting specific opportunities for improvement to enhance support quality.
Email Signature Templates
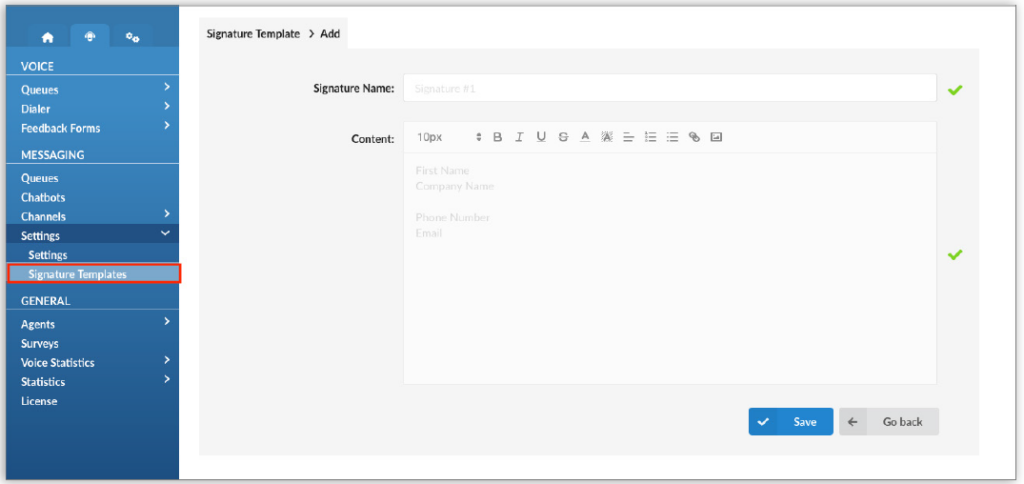
The Email Signature Templates feature allows users to create and manage personalized signature templates directly within the graphical user interface (GUI). Agents can use these templates in the Agent application as ready-to-use signatures or customize them to fit their needs. This feature helps maintain a professional appearance and ensures consistent branding in all communications.
Live Chat – Leave a Message Form
The “Leave a Message Form” is designed to work in conjunction with the “Operation Times” (OT) feature. When activated, it allows users to specify an email address to receive messages initiated via Live Chat during non-working hours. By default, this feature is set to “No” and must be enabled by selecting “Yes.” Users must also assign an email address for the form, requiring at least one email channel configured on the system.

When the “Leave a Message Form” feature is active, and users access Live Chat, they will receive a greeting regarding the operation times (OT) of the business queue after initiating the conversation. If they choose to leave a message, they will be prompted to fill out a form where they need to provide their email address, a brief subject, and a short description of their issue. Once this information is submitted, the Live Chat conversation will be converted into an email conversation, and users can expect to receive responses accordingly.
Pre-Chat Form
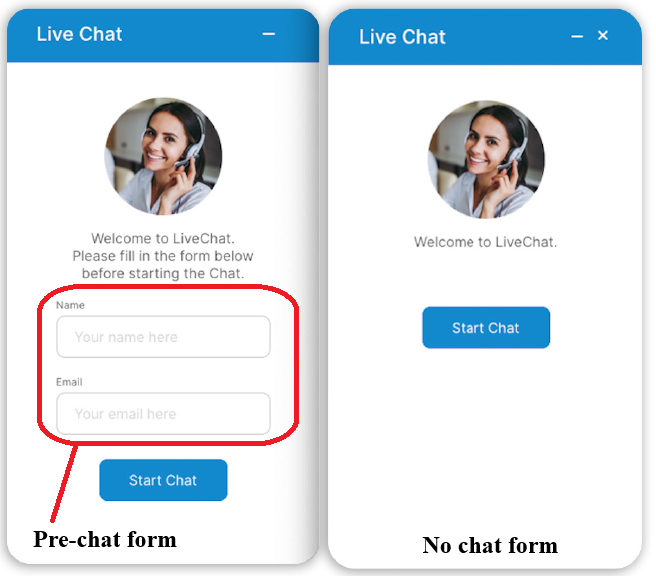
The “Pre-Chat Form” can be enabled within the Channels section. If disabled, users have the option to start conversations anonymously. Customers can initiate a chat without providing their details (name and email), which can streamline the process and enhance user engagement.
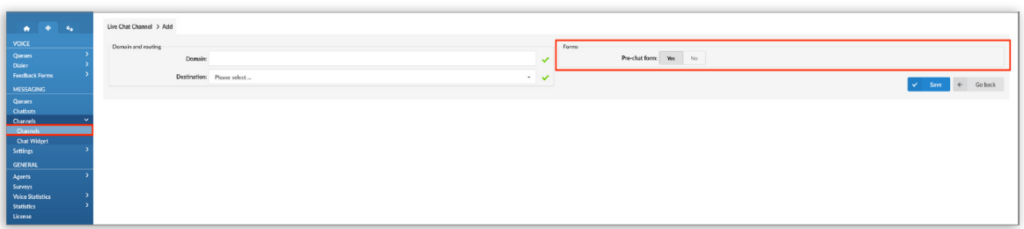
Pre-chat forms are valuable for gathering essential information about a visitor. However, to protect visitor privacy—especially in regions where collecting certain personal information is restricted—we’ve made this feature fully configurable.
Visitor App
Customers can start a chat by providing their name and email or begin the chat anonymously, allowing them to engage without sharing their personal information.
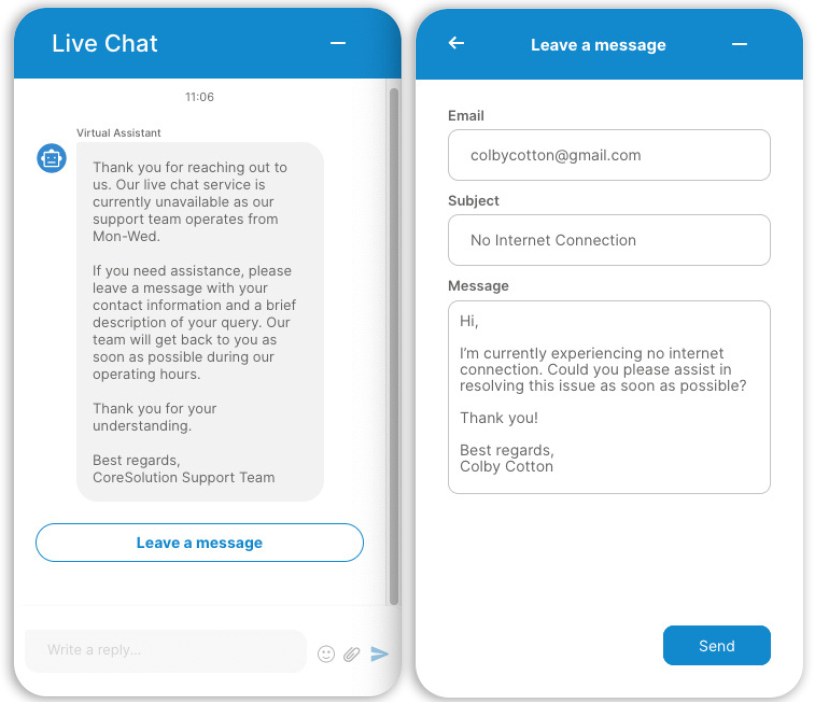
Once the blue chat icon is clicked, the chat window appears, enabling users to begin conversing with either an agent or a chatbot. This approach enhances the user experience by removing barriers to starting a conversation.
Returning Customer Feature
The Returning Customer feature enhances the customer experience by routing repeat callers to the same agent they previously spoke with, provided that the agent is available. If the agent is unavailable, the call will follow the ring strategy configured for the queue. This feature promotes continuity, allowing returning customers to connect with a familiar agent, which can improve overall satisfaction.
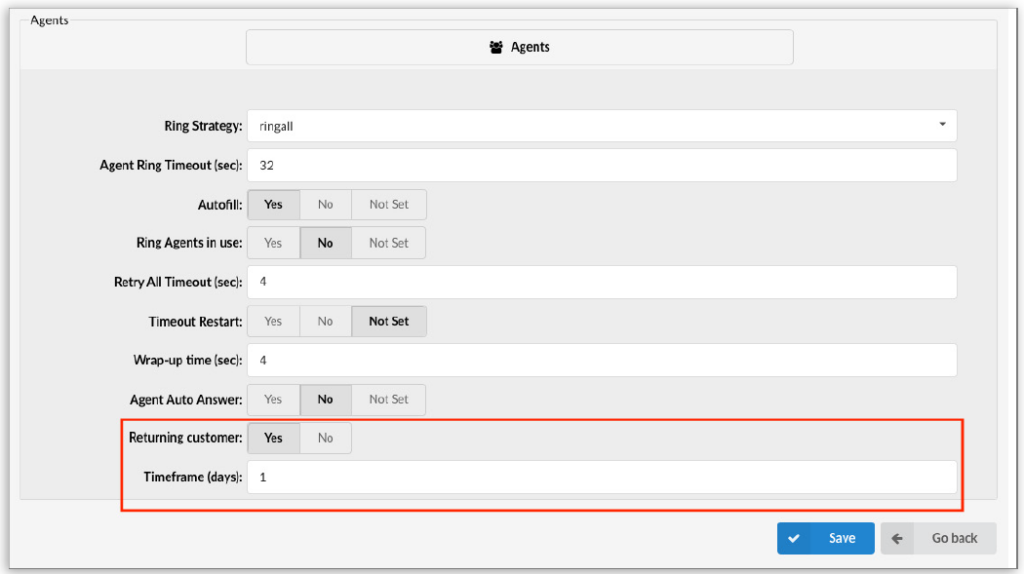
Administrators can set a custom timeframe for identifying returning customers, allowing the system to automatically analyze repeat calls within the specified number of days and route them to the same agents. For example, setting the timeframe to 1 day ensures customers who call back within 24 hours will be directed to the agent they previously talked to.
Version 7.3
7.3 brings major upgrades to SMS features, especially for mass SMS messaging and campaigns. With new tools like Blocklist, Predefined lists, and Opt-in and Opt-out options, customers can now enjoy a more streamlined and effective SMS marketing experience. These enhancements will make SMS messaging easier and more efficient for businesses of any size.
SMS Blocklist
The SMS Blocklist feature empowers administrators with the ability to selectively exclude designated phone numbers from receiving mass SMS communications. This can be achieved either manually through the “Add Number to the Blocklist” function or automatically when recipients opt out by replying with an Opt-out keyword (that can be defined within SMS settings) in an SMS message, signaling their preference to cease receiving mass messages. Numbers listed on the Blocklist will be excluded from receiving communications specifically from mass SMS campaigns. However, it’s important to note that direct SMS messages sent by users will remain unaffected, ensuring uninterrupted communication.
[]SMS – Predefined Lists
The Predefined list feature allows you to create lists of SMS numbers that will be used for mass SMS campaigns.
[]Clicking on the Add Predefined list button will open a new window, allowing users to assign a name to the new predefined list. At this step, the Upload CSV option can be used to import a list of SMS numbers using a CSV file. If you don’t upload a file and simply click the Save button, an empty list will be created. Once the list is created, it can be edited to manually add the SMS numbers in.
SMS – Ability to Opt-out
This feature allows users to configure the Opt-In and Opt-Out SMS features with ease. With this configuration in place, end users can seamlessly manage their preferences regarding receiving mass SMS messages from campaigns. With the Opt-In feature, recipients have the choice to subscribe to further SMS messages, while the Opt-Out option allows them to discontinue receiving such messages. It is worth noting that the system prevents confusion by disallowing the use of identical keywords for both Opt-In and Opt-Out functionalities. Additionally, duplicate entries in
either field prompt a warning message, ensuring clean configuration and adherence to user preferences.
Operation Times overview
The Operation Times page, added to the Reports menu, allows users to quickly inspect the system elements on which Operation Times rules are enabled and access them from a single point for easy modification.
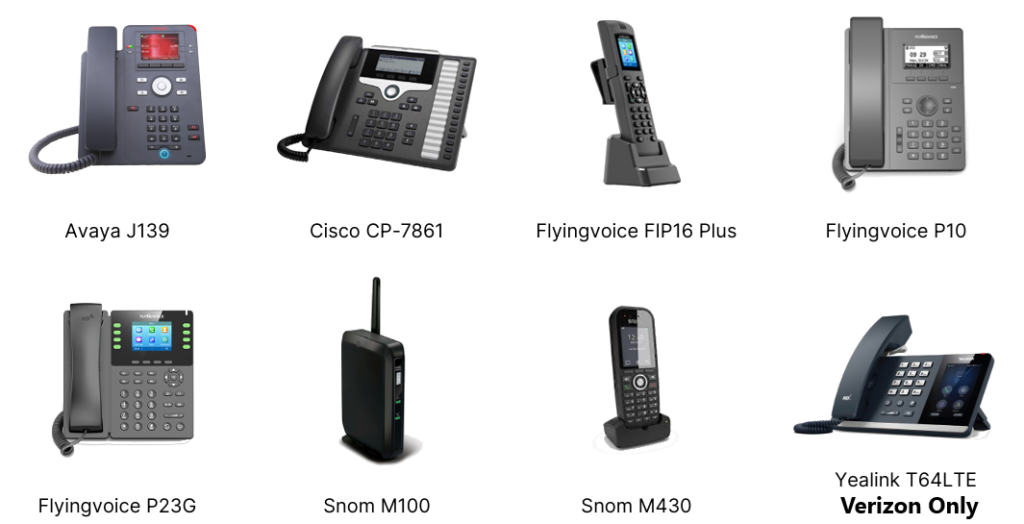
New Endpoints
CONTACT CENTER MODULE
Settings
The First Response Timeout functionality has been enhanced and divided into three sections for better management: Live Chat, Messaging, and Email. For Live Chat interactions, this feature permits automatic ticket transfers upon timeout expiration, with users able to\ define a timeout in minutes and an unanswered action, such as logging off or pausing an agent. Similarly, for Messaging interactions, including SMS, Facebook, and WhatsApp,\ users can toggle the automatic transfer setting to ‘Yes’, specify a timeout in minutes, and set an unanswered action. For Email interactions, the feature allows users to set a timeout in hours and choose an unanswered action to ensure no customer queries are unattended. In all cases, this mechanism redirects queries to an available agent from a designated queue, enhancing response efficiency and customer satisfaction. These updates aim to provide more tailored management of customer interactions, ensuring that no query goes unanswered and improving overall service quality. This structured approach allows support teams to respond promptly and maintain high standards of customer service.
Chat Transcripts
View Chat Transcripts
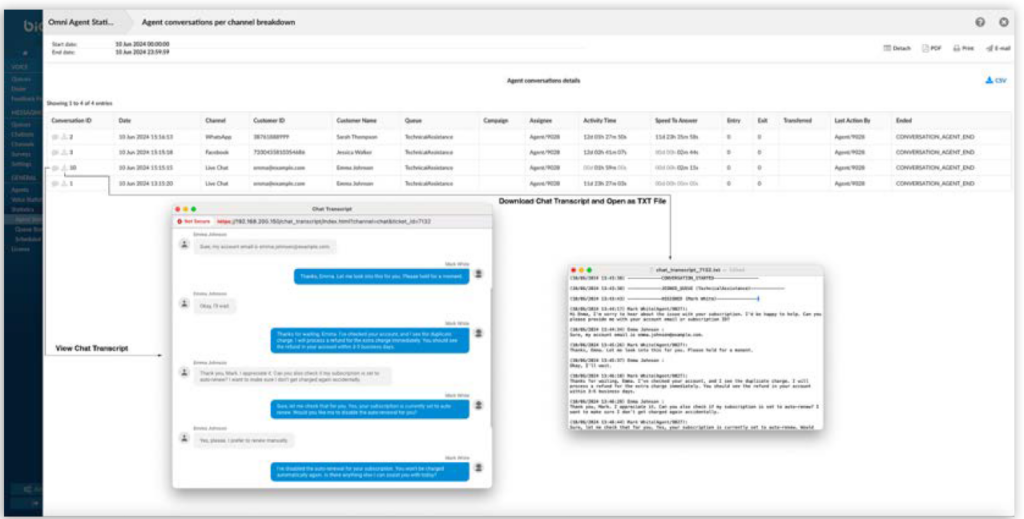
This feature enhances the ability to review customer interactions by allowing users to navigate to Statistics and open Breakdowns. From there, users can select a conversation and choose to view the chat transcript in a new window. This capability ensures that all details of customer interactions are readily accessible for comprehensive review.
Download and Open as TXT File
In addition to viewing transcripts, users can now download chat transcripts and open them as TXT files. This feature applies to all chat transcripts and emails, providing an easy way to save and review conversations offline. By having this option, users can maintain organized and easily accessible records of all customer communications.
These new features collectively improve the efficiency of reviewing and managing customer interactions, providing a better overall experience for both agents and supervisors.