

When you are assigned a new extension, there are a few important steps to complete before it is ready for use.
- New Extension Email
-
- The first step is to locate the New Extension email. This message is sent from support@firelinecommunications.com when your extension is created, or when an existing extension is reassigned to you. This email contains all the essential details you need to access and manage your extension effectively.
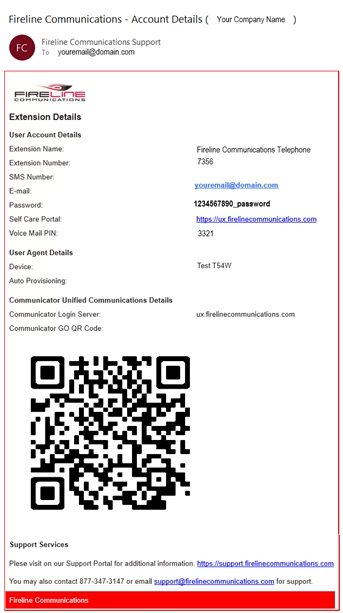
- The first step is to locate the New Extension email. This message is sent from support@firelinecommunications.com when your extension is created, or when an existing extension is reassigned to you. This email contains all the essential details you need to access and manage your extension effectively.
- Record your Voicemail Greeting and Name
- You can access your voicemail 3 different ways
- Press the voicemail key on your telephone. The voicemail key is usually identified by the envelope icon on it.
- If you are at a different extension than the one assigned to you, you can dial *124 from the phone and wait for the prompts.
- Enter Voicemail Box number: This is your extension number.
- Enter the PIN: Voice Mail PIN can be found in the email.
- Dial in from the outside and transfer to your mailbox.
- When your voicemail answers, press the * key
- You will be prompted for your PIN
- After logging into your voicemail box press 0 to enter voicemail settings.
- Press 1 to create your unavailable message.
- Press 2 to create your busy message.
- Press 3 to record your name. (Used by Auto-Attendant Search)
- Press 5 to change your PIN
- Once complete press * or hang up the telephone.
- You can access your voicemail 3 different ways
- Setup Self Care Access
- To set up the features for your Self Care you must login to https://ux.firelinecommunications.com.
- Enter the email and password found in the Account Details Email.

- Click the “Login” button
- Under “My Details” tab, you should see the fields below
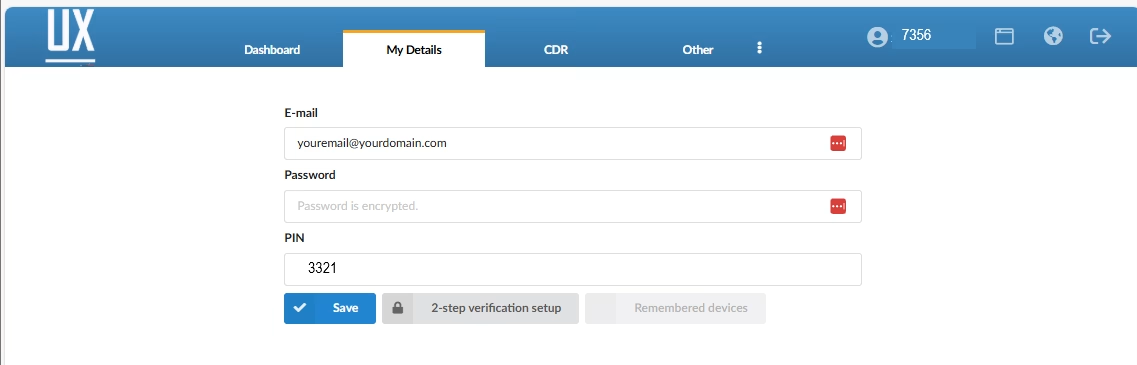
- Change the temporary password to something you will remember.
- Change your PIN if needed
- Click Save
- 2-Step Verification Setup
- Click the 2-step verification setup button next to the “Save” button
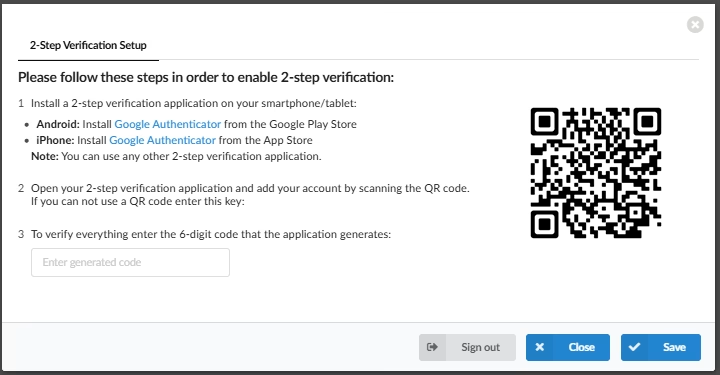
- Once complete, click the save button
- Click the 2-step verification setup button next to the “Save” button
- Voicemail Settings
- To update your voicemail options
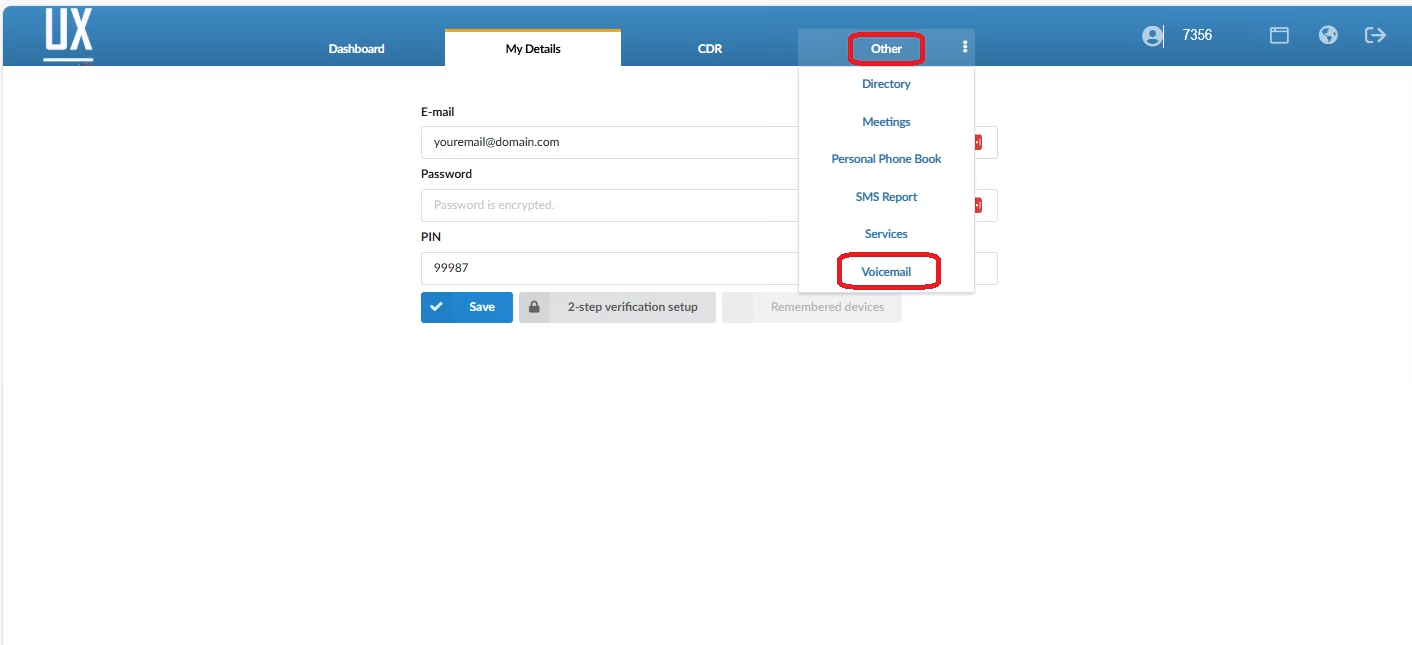
- Click the “Other” tab
- Move down to Voicemail and select it.
- Next select the Voicemail Features button
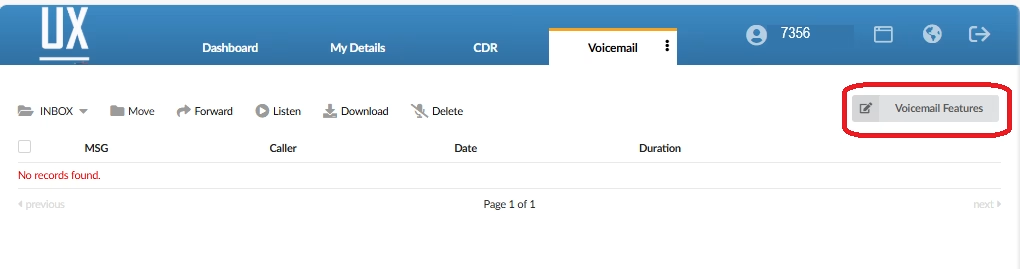
- You will be presented with the options for your voicemail.
- Select the features you would like to use. (see field definitions below)
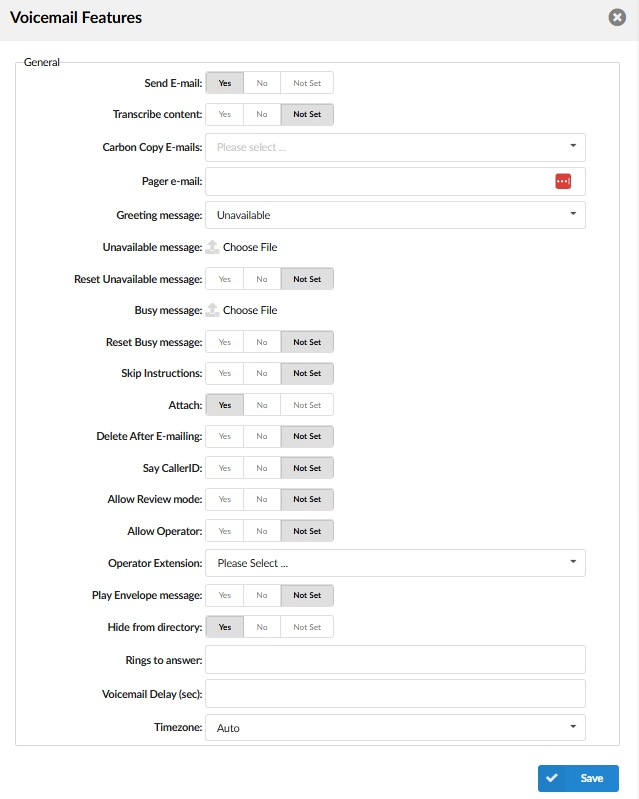
- Once Complete Click Save
- To update your voicemail options
Congratulations, you have completed your telephone Voicemail setup!
Voicemail Feature Definitions
- Send Email: When caller leaves a voicemail, notify the user based on the extension’s primary email address and any carbon copy emails found in the Voicemail Feature settings.
- Transcribe Content: If you have transcription features enabled, the system will transcribe the voicemail message and send it via email.
- Carbon Copy E-mails: Additional email addresses that the voicemail will be sent to.
- Pager email: Additional email address where a voicemail alert message will be sent.
- No attachments will be included in this email.
- Greeting message: Greeting message played to users upon entering the voicemail box.
- Options
- Unavailable
- Busy
- None
- Options
- Unavailable Message: Allows you to upload a customer message or download the current message.
- Reset Unavailable Message: Allows you to reset the message back to factory.
- Skip Instructions: If set to “Yes,” caller will go straight to hearing the prerecorded voicemail greeting and not play the system instructions to the caller.
- Attach: Allows you to include the audio recording of the caller’s voicemail message in the email notification.
- Say CallerID: If set to “Yes,” the caller’s CallerID number will be announced for all messages.
- Allow Review Mode: Allows the caller to review the voicemail message before sending it to your mailbox.
- Allow Operator: Allows you to assign another extension to answer calls if you want to give callers the option to press “0” and escape the voicemail to a live person.
- Operator Extension: If Allow Operator is set to Yes, choose destination for calls.
- Play Envelope Message: If set to “Yes,” the system will play Date, Time and telephone number of the caller.
- Hide from Directory: Allows you to hide your mailbox from the Auto Attendant / IVR search by name.
- Rings to answer: Please DO NOT modify this value. It does not allow you to set the number of rings before the call goes to voicemail.
- The setting to change the number of rings before the call forwards to voicemail is currently found in the Admin portal and accessible by your system administrator. To change number of rings before call goes to voicemail, please email your system Administrator or support@firelinecommunications.com for assistance.
- Voicemail Delay (sec): Allows you to set a delay before the system asks for PIN/Password. If you experience an issue when calling the voicemail, increase this value by 1.
- Time Zone: Allows you to set a different time zone other than the default, which is based on the default location of your phones
To learn more about Voicemail, please see the Voicemail Guide.
Last Updated on September 9, 2025